Our VPN Server provides flexible VPN solutions to secure your data communications, whether it’s for Internet privacy, remote access for employees, securing IoT, or for networking Cloud data centers.

This is a quick deployment and ready-to-run image.
Simple and rapid installation. Easy to maintain.
The connection to the VPN Server on CentOS 8.2.
- First, to connect to the VPN Server on Linux CentOS 8.2, you should open port 1194 by the UDP Protocol in the network properties on AWS Firewall.
- To connect to the VM, you should generate a “Private Key” in advance. This can be done using the following instruction (by choosing the “file format:” option “.ppk” in point 3)
Guide – How To – Create and use Key Pair to connect to a VM
- Download and run Putty
- Go to the “SSH” section in the left panel and then to “Auth”.
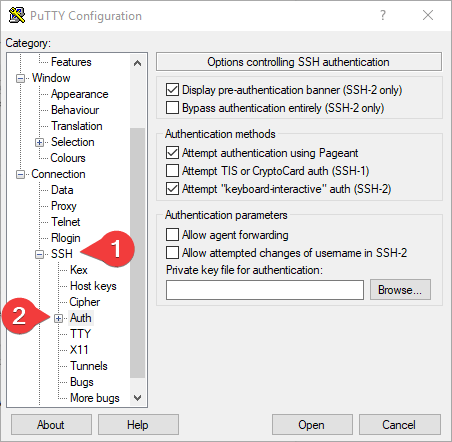
- In the “Auth” section, click “Browse” and specify the path to the .ppk file you received earlier.
- Go to the home page of “Session”, enter the IP address of the VM, and click “Open”.

- In the opened console you will need to enter the login centos
- Next, you should enter the following commands:
> sudo vpnusers

- To create a new user type “1” and press Enter
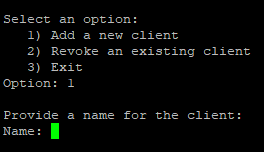
- Write a user name and press Enter

- The last line will tell you where the config file is available (exampleuser.ovpn in this case)
- You need to copy the contents of this file. To do this, display the contents of the file on the screen with the following command::
> cat exampleuser.ovpn
Don’t forget to replace “exampleuser” with the username that was created in Step 9

- Copy the entire contents of the file by selecting it and pressing Ctrl + Insert
- Open Notepad or any other text editor and paste the contents of the file into a blank document
- Save the file with the extension .ovpn

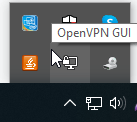
- Run OpenVPN GUI. If you don’t have OpenVPN installed you can download it here.
- Click on the “Show hidden icons” and right mouse button on the OpenVPN GUI.
- Go to “Settings – Advanced” and in the “Configuration Files – Folder” specify the path to the file that you unpacked from the archive and click “OK”.

- Right-click on OpenVPN GUI again, point to the connection that appears, and click Connect
