Gogs – Extensible Self-Hosted Git Service aims to build a simple, stable and extensible self-hosted Git service that can be setup in the most convenient way.
![]()
This is a quick deployment and ready-to-run image.
Simple and rapid installation. Easy to maintain.
Configuration and connection to Gogs on Ubuntu
- After purchasing a virtual machine, find its IP address in the Azure personal account.
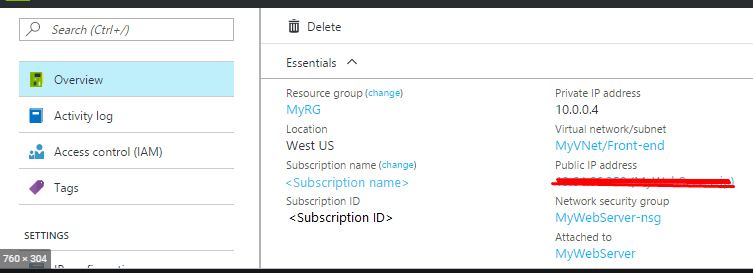
- To connect to Gogs, you should open the 3000 TCP port in the Azure network settings.
- You must create a DNS name. In the Azure admin, you should go to the VM properties on the left the “Overview” section in it, on the right you must configure the DNS name, the name will become, for example, “gogs123.eastus.cloudapp.azure.com”.
If you have your own DNS name, then it is not necessary to configure it.
- Open a browser on your PC and go to the DNS address http://domain_name:3000, where domain_name this is the address of your DNS name or DNS configured on Azure in the previous step (for example: http://gogs123.eastus.cloudapp.azure.com:3000)
Upon transition, the following page will be displayed:
- Next, you should make a one-time, primary server configuration.
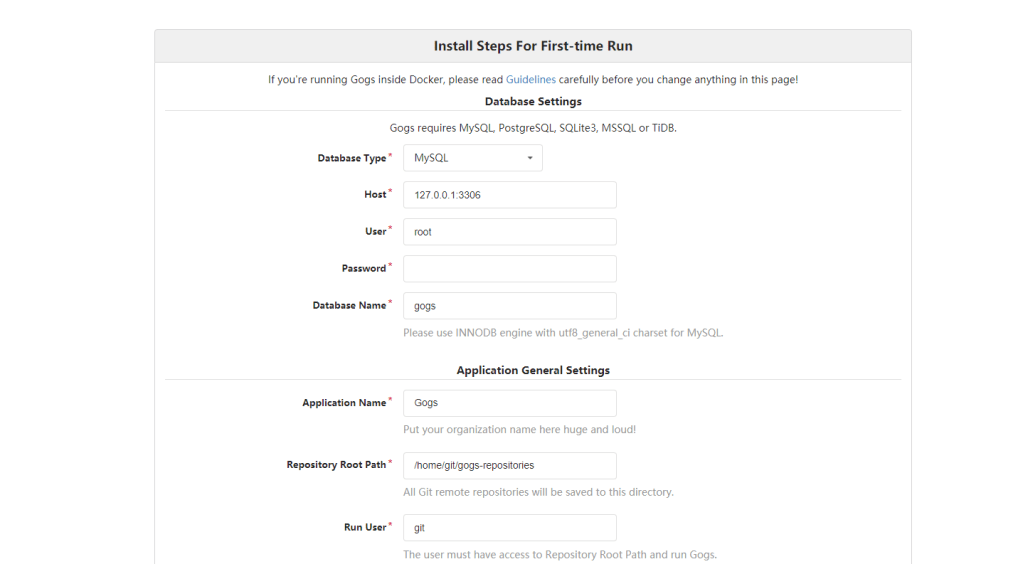
The page with the initial setting will be opened: http://domain_name:3000/install, where domain_name is the address of your DNS name or DNS configured on Azure from step 3.
On the page, select the following settings:
Database Type: SQLite3
In the Path setting that appears, change the path to: /home/git/gogs/gogs.db
Application Name – enter your preferred name.
Domain – replace localhost with your domain name (for example: gogs123.eastus.cloudapp.azure.com)
Application URL – replace localhost with your domain name (for example: http://gogs123.eastus.cloudapp.azure.com:3000/)
Log Path – change the default path /home/git/gogs/log на /home/git/gogs/logs
Leave the rest of the settings by default.
Click on the “Install Gogs” button at the bottom of the page to complete the configuration settings, then the “Sign in” page will open:

Then click on the “Register” button in the upper right.
The page address in the browser changes to:
http://domain_name:3000/user/sign_up
Enter your preferred “Username” and your “Email Address”.
Create and verify “Password” and enter the “Captcha” from the image.
Create a user by clicking “Create New Account”.
Password Requirements:
- at least one special character (punctuation, brackets, quotation marks, etc.);
- at least one lowercase character;
- at least one uppercase character;
- at least one digit.
The first user will receive administrator rights on the portal.
More detailed instructions can be found at:
