The Secure SFTP – FTP Server for Windows Server 2016 Image is fully configured for quick and easy deployment of FTP/FTPS/SFTP Server allowing you to remove the need for you to host your own server, manage the service and maintain the security and integrity of the solution.

This is a quick deployment and ready-to-run image.
Simple and rapid installation. Easy to maintain.
Configuration and connect to the SFTP – FTP Server for Windows Server 2019 OpenSSH
First, you need to open TCP port 22 in the network properties of the Amazon Firewall.
The акуу folder is created on the VM. Subfolders with user names are created automatically when they enter the first time on SFTP.
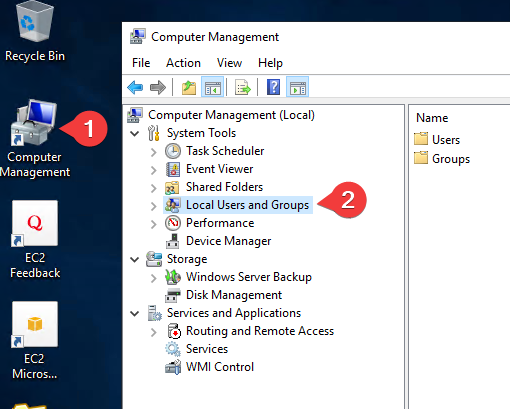
To authenticate a local user on the server, open the shortcut “Computer Management” and go to the Local Users and Group section.
After creating the user on Windows, you need:
- Stop the SFTP server service by running the “stop ftp” shortcut on the desktop.

- Create the necessary users in the server admin panel.
To add a user to the server, you need to click the shortcut on the desktop “freeFTPd”.
It may happen that the application window does not open.

To open the main application window, click the right mouse button on the icon in the tray and select “Configure”. When opened, the following will be displayed:

To add SFTP users, go to the “Users” tab and click the “Add” button:

In the user registration window, enter “Login”.
Select “Password stored as SHA1 hash” in the drop-down list of the “Authorization” field,
Next, in the “Password” field, enter any user-friendly password and confirm it in the “Password (again)” field.
Disable the use of “FTP server” and click Apply.

- After creating the necessary users, you need to:
– go to the SFTP tab and make sure that “Server status: Stopped!”
– start the service by clicking the “Start” button (“Server status” will become “Running…”)
– click the “Apply & Save” button
Note. If you cannot connect to the server, restart it in the following way:
– go to the SFTP tab and make sure that “Server status: Stopped!”
– start the service by clicking the “Start” button (“Server status” will become “Running…”)
– click the “Apply & Save” button
– click “Stop” (“Server status” will become “Stopped!”)
– close the application window by clicking on the cross (the application minimizes to tray)
– open the Windows tray, click the right mouse button on the freeFTPd icon, and select “Quit”.
– start the SFTP server service using the “start ftp” shortcut on the desktop.
Connecting to SFTP Server
To connect to SFTP, it is recommended to use the “FileZilla Client” application (you can download it from the link: https://filezilla-project.org/download.php?platform=win64).
When launched, the application looks like this:

In the “Host” field enter: sftp://SFTP , where SFTP is the address of your machine in the personal account in Azure.
Enter the username and the password you created on the SFTP server in the “Username” field, and the password in the “Password” field.
When the data is entered, click on “Quickconnect”.
Then you will see the next window which asks if you can trust the host and its signatures, in this window you need to click “OK”:

SFTP user folder is automatically created in the “C:\sftp” folder when the user connects to SFTP first time. You can transfer files in this folder, so a user can view them.
FAQ:
Question: I get the error “The specified address is already in use”
Answer: This error occurs because of the freeFTPd instance background running. To resolve this, you need to cancel all other instances of freeFTPd in the task manager, and then open it again. Also, you can just stop freeFTPService and restart it.
