DVD CD Blu-ray Burner is a fast and convenient app to burn and store your music, movies, and any other data on discs, including CD-R, CD-RW, DVD-R, DVD-RW, Mini DVD-R, Mini DVD-RW, Blu-ray-R, Blu-ray-RW.

It is kindly recommended to make sure that your Optical Disc Drive is ensured with the recording function, and supports the Disc type you want to burn.
The fastest way to check this:
- Open the Device Manager.
- In the Device Manager window, click the plus (+) next to DVD/CD ROM drives to expand the selection.
- If the computer has an internal CD / DVD / Blu-ray disc optical drive, it will be listed in the optical drive description.
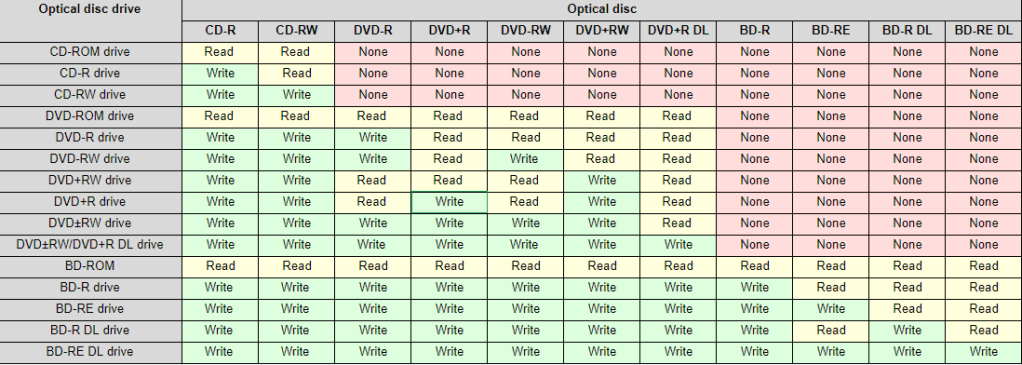
Most Optical Disc Drives are backward compatible with their ancestors up to CD, but not the vice-versa.
Use this table to learn about what Optical discs types your Drive is able to burn:
Let’s run the Application:
1. In order to change the language, theme, or send us feedback you should go to the settings by clicking the “Settings” icon in the upper right corner.

The following window will appear:

2. Before start you should check if the disc you want to burn is inserted and then run the Application. the following windows will appear, If the disc is not inserted:

3. If this is not a blank disc manufactured specially for recording/rewriting or it is inappropriate to be burned for some reason, the following windows will appear.

4. If the disc is appropriate you will see the following window. Where you can select the necessary drive – “Select disc:” menu item
(Don’t change this option if you don’t understand it. Use the optical drive which was determined automatically by the application) and rename the disc – “Name:” menu item.

5. The following window will appear if the disc is not empty:

It will be prompted either to Add more data to the one that already exists on the disc, or Rewrite the disc, by replacing all of the already-existing data with the one that will be added in the current session.
NOTE:
- Disc type “RW” can be written, read, erased, and re-written again plenty of times.
- Disc type “R” can be written only once and read many times. Nevertheless, you may be able to add more data to the disc in the further, as long as the following burning requirements will comply:
1) The appropriate burning method was chosen in the first burning session.
2) Enough space is left on the disc to add desired data.
6. The “Disc Capacity Indicator” at the bottom of the application window, displays the information of total disc size and the used disc space:

7. After the disc was determined successfully, an appropriate drive was chosen (if needed), and the disk was renamed (optional) – you can proceed to the adding desired data to the disc for the burning. To do this click either the “Next” button or click directly to the “Data Disc”.

8. The following menu will be opened:

This is the main section, where you create burning sessions and perform all operations:
- Adding data you want to burn to the current burning session
- Managing this data (rename, create folders, sort and remove)
- Erase data that already exists on the disc
- Burn the new disc
Further, we elaborate on each of them.
9. In order to add files or folder to the current burning session you can use the drag & drop function or click the “Add File” button or “Add Folder” button.

11. Use the “New folder” button to create a folder right into your disc and add files there.

12.To remove a file or folder, that was added for the current burning session you should select one or multiple items and click the “Remove” button, or click the “Remove All” button to remove all at once.

13. You can rename a file or folder by clicking the right mouse button on it, and the “Rename” option.

14. If your disk type is RW you are able to erase this disc. To do this click on the “Erase Disc” button.

15. If you have added all necessary files and folders for the burning click the “Start” button to burn the disc.

16. The following window will appear:

Here you can see the process of the burning and the remaining time.
We hope this Usage Guideline was effortless to read and not sophisticated to understand and you have learned how to burn discs using DVD CD Blu-ray Burner application. We will be glad if it sheds light on all of the questions you have or will get.
Nevertheless, if something was unclear and you require any further information please feel free to contact us! If we can be of assistance on any issue or with advice – It would be a pleasure to provide you with this. Good Luck!
